実際に使えるものを作る
Hello, Stimulusの章で、はじめてコントローラを実装し、 Stimulus が HTML と JavaScript をどのように接続するかを学びました。 次は、Basecamp で使われているコントローラを再現して、実際のアプリケーションで使えるものを見てみましょう。
原文
Building Something Real
We’ve implemented our first controller and learned how Stimulus connects HTML to JavaScript. Now let’s take a look at something we can use in a real application by recreating a controller from Basecamp.
# 「クリップボードにコピーする」機能を作る
BasecampのUIには、以下のようなボタンがよく見られます:
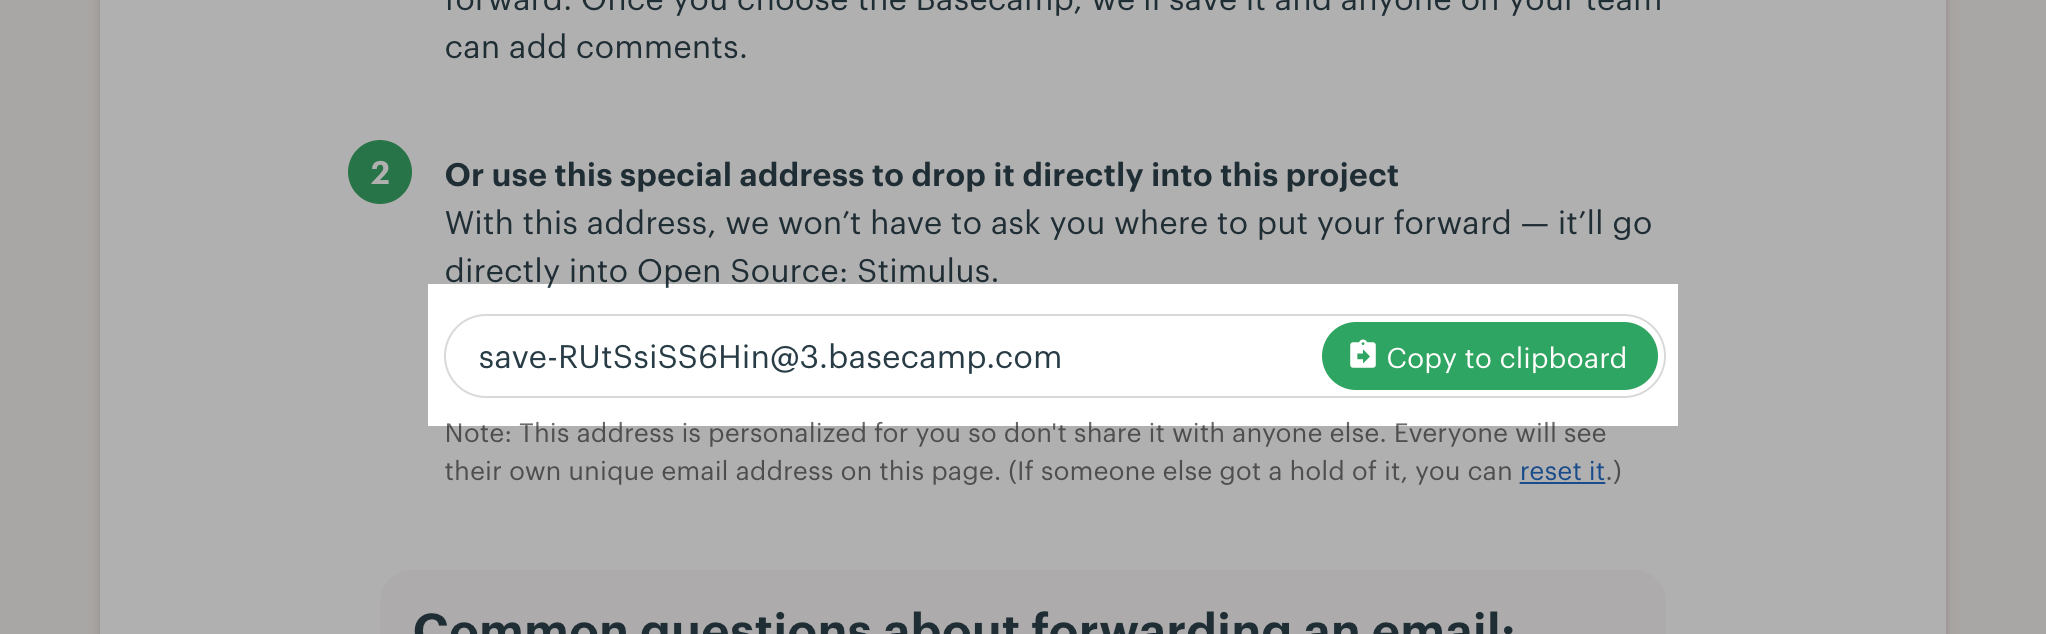
これらのボタンをクリックすると、URLやメールアドレスなどのテキストがクリップボードにコピーされます。
ウェブプラットフォームにはシステムのクリップボードにアクセスするAPIがありますが、それを行うHTML要素はありません。「クリップボードにコピー」ボタンを実装するには、JavaScriptを使う必要があります。
原文
# Wrapping the DOM Clipboard API
Scattered throughout Basecamp’s UI are buttons like these:
Screenshot showing a text field with an email address inside and a ”Copy to clipboard“ button to the right When you click one of these buttons, Basecamp copies a bit of text, such as a URL or an email address, to your clipboard.
The web platform has an API for accessing the system clipboard, but there’s no HTML element that does what we need. To implement a “Copy to clipboard” button, we must use JavaScript.
# コピーボタンの実装
例えば、PINを生成して他の人にアクセスを許可できるアプリがあるとします。 生成されたPINを簡単に共有できるように、クリップボードにコピーするボタンと一緒に表示しておけば便利です。
public/index.htmlを開き、<body>の中身を以下のように置き換えます:
<div>
  PIN: <input type="text" value="1234" readonly>
  <button>Copy to Clipboard</button>
</div>
原文
# Implementing a Copy Button
Let’s say we have an app which allows us to grant someone else access by generating a PIN for them. It would be convenient if we could display that generated PIN alongside a button to copy it to the clipboard for easy sharing.
Open public/index.html and replace the contents of <body> with a rough sketch of the button:
<div>
  PIN: <input type="text" value="1234" readonly>
  <button>Copy to Clipboard</button>
</div>
# コントローラーのセットアップ
次に、src/controllers/clipboard_controller.jsを作成し、空のメソッドcopy()を追加します:
// src/controllers/clipboard_controller.js
import { Controller } from "@hotwired/stimulus"

export default class extends Controller {
  copy() {
  }
}次に、外側の<div>にdata-controller="clipboard"を追加します。 この属性が要素に現れると、Stimulusはコントローラのインスタンスを接続します:
<div data-controller="clipboard">原文
# Setting Up the Controller
Next, create src/controllers/clipboard_controller.js and add an empty method copy():
// src/controllers/clipboard_controller.js
import { Controller } from "@hotwired/stimulus"

export default class extends Controller {
  copy() {
  }
}
Then add data-controller=“clipboard” to the outer <div>. Any time this attribute appears on an element, Stimulus will connect an instance of our controller:
<div data-controller="clipboard"># Targetを定義する
クリップボードAPIを呼び出す前にその内容を選択できるように、テキストフィールドへの参照が必要になります。 テキストフィールドにdata-clipboard-target="source"を追加します:
PIN: <input data-clipboard-target="source" type="text" value="1234" readonly>コントローラにターゲット定義を追加し、this.sourceTargetプロパティでテキストフィールド要素にアクセスできるようにします:
export default class extends Controller {
  static targets = [ "source" ]

  // ...
}
# static targets = … の行は何ですか?
Stimulusはコントローラクラスをロードするとき、
targetsと呼ばれる静的配列からターゲット名を抽出します。 配列内の各ターゲット名に対して、Stimulusは3つの新しいプロパティをコントローラに追加します。 ここでは、ターゲット名が"source"なので以下のようなプロパティになります:
this.sourceTargetコントローラのスコープ内の最初のsourceターゲットとして評価されます。sourceターゲットが存在しない場合、プロパティへのアクセスはエラーとなります。
this.sourceTargetsコントローラのスコープ内の全てのsourceターゲットの配列として評価されます。
this.hasSourceTargetsourceターゲットがある場合はtrueに、ない場合はfalseに評価されます。targetsについての詳細はリファレンスを参照して下さい。
原文
# Defining the Target
We’ll need a reference to the text field so we can select its contents before invoking the clipboard API. Add data-clipboard-target=“source” to the text field:
PIN: <input data-clipboard-target="source" type="text" value="1234" readonly>Now add a target definition to the controller so we can access the text field element as this.sourceTarget:
export default class extends Controller {
  static targets = [ "source" ]

  // ...
}
# What’s With That static targets Line?
When Stimulus loads your controller class, it looks for target name strings in a static array called targets. For each target name in the array, Stimulus adds three new properties to your controller. Here, our “source” target name becomes the following properties:
- this.sourceTarget evaluates to the first source target in your controller’s scope. If there is no source target, accessing the property throws an error.
- this.sourceTargets evaluates to an array of all source targets in the controller’s scope.
- this.hasSourceTarget evaluates to true if there is a source target or false if not.
You can read more about targets in the reference documentation.
# Actionをつなぐ
これで、コピーボタンをフックする準備ができました。
ボタンをクリックすると、コントローラのcopy()メソッドが呼び出されるようにしたいので、data-action="clipboard#copy"を追加します:
<button data-action="clipboard#copy">Copy to Clipboard</button># アクションの省略記法について
アクション記述子から
click->が省略されていることにお気づきかもしれません。 これは Stimulus が<button>要素のアクションのデフォルトイベントとしてclickを定義しているからです。他の要素にもデフォルトイベントがあります。 以下が完全なリストです:
要素 デフォルトイベント a click button click details toggle form submit input input input type=submit click select change textarea input
最後に、copy()メソッドで入力フィールドの内容を選択し、クリップボードAPIを呼び出します:
copy() {
  navigator.clipboard.writeText(this.sourceTarget.value)
}
ページを際読み込みし、コピーボタンをクリックしましょう。 次にテキストエディタに戻り、ペーストします。 PINコードの「1234」が表示されるはずです。
原文
# Connecting the Action
Now we’re ready to hook up the Copy button.
We want a click on the button to invoke the copy() method in our controller, so we’ll add data-action=“clipboard#copy”:
<button data-action="clipboard#copy">Copy to Clipboard</button># Common Events Have a Shorthand Action Notation
You might have noticed we’ve omitted click-> from the action descriptor. That’s because Stimulus defines click as the default event for actions on
<button>elements.Certain other elements have default events, too. Here’s the full list:
Element Default Event a click button click details toggle form submit input input input type=submit click select change textarea input
Finally, in our copy() method, we can select the input field’s contents and call the clipboard API:
copy() {
  navigator.clipboard.writeText(this.sourceTarget.value)
}
Load the page in your browser and click the Copy button. Then switch back to your text editor and paste. You should see the PIN 1234.
# Stimulus Controllerは再利用可能
これまで、ページ上にコントローラのインスタンスが1つずつある場合の動作を見てきました。
ページ上に複数のコントローラのインスタンスが同時に存在することは、珍しいことではありません。 たとえば、暗証番号のリストを表示し、それぞれにコピーボタンを表示したいとします。
今し方作ったこのコントローラは再利用可能です。 テキストをクリップボードにコピーする方法を提供したい場合、適切なアノテーションをページにマークアップするだけです。
試しに同じページに別のPINを追加してみよう。<div>をコピー&ペーストして同じPINフィールドが2つできるようにし、2つ目のvalue属性を変更します:
<div data-controller="clipboard">
  PIN: <input data-clipboard-target="source" type="text" value="3737" readonly>
  <button data-action="clipboard#copy">Copy to Clipboard</button>
</div>
ページをリロードし、両方のボタンが機能することを確認しましょう。
原文
# Stimulus Controllers are Reusable
So far we’ve seen what happens when there’s one instance of a controller on the page at a time.
It’s not unusual to have multiple instances of a controller on the page simultaneously. For example, we might want to display a list of PINs, each with its own Copy button.
Our controller is reusable: any time we want to provide a way to copy a bit of text to the clipboard, all we need is markup on the page with the right annotations.
Let’s go ahead and add another PIN to the page. Copy and paste the
<div data-controller="clipboard">
  PIN: <input data-clipboard-target="source" type="text" value="3737" readonly>
  <button data-action="clipboard#copy">Copy to Clipboard</button>
</div>
Reload the page and confirm that both buttons work.
# アクションとターゲットはあらゆる要素に適用できる
では、もうひとつPINフィールドを追加しましょう。今回はボタンの代わりにコピーリンクを使います:
<div data-controller="clipboard">
  PIN: <input data-clipboard-target="source" type="text" value="3737" readonly>
  <a href="#" data-action="clipboard#copy">Copy to Clipboard</a>
</div>Stimulusでは、適切なdata-action属性さえあれば、どんな種類の要素でもアクションメソッドを呼び出すことができます。
今回の場合、リンクをクリックするとブラウザはリンクのhrefをたどります。 アクションの中でevent.preventDefault()を呼び出すことで、このデフォルトの動作をキャンセルすることができます:
copy(event) {
  event.preventDefault()
  navigator.clipboard.writeText(this.sourceTarget.value)
}同様に、sourceターゲットは<input type="text">である必要はありません。 コントローラが期待しているのは、valueプロパティとselect()メソッドだけです。 つまり、代わりに<textarea>を使用することもできます:
PIN: <textarea data-clipboard-target="source" readonly>3737</textarea>原文
# Actions and Targets Can Go on Any Kind of Element
Now let’s add one more PIN field. This time we’ll use a Copy link instead of a button:
<div data-controller="clipboard">
  PIN: <input data-clipboard-target="source" type="text" value="3737" readonly>
  <a href="#" data-action="clipboard#copy">Copy to Clipboard</a>
</div>
Stimulus lets us use any kind of element we want as long as it has an appropriate data-action attribute.
Note that in this case, clicking the link will also cause the browser to follow the link’s href. We can cancel this default behavior by calling event.preventDefault() in the action:
copy(event) {
  event.preventDefault()
  navigator.clipboard.writeText(this.sourceTarget.value)
}
Similarly, our source target need not be an <input type="text">. The controller only expects it to have a value property and a select() method. That means we can use a <textarea> instead:
PIN: <textarea data-clipboard-target="source" readonly>3737</textarea># おさらいと次のステップ
この章では、ブラウザAPIをStimulusコントローラでラップする実例を見てきました。 コントローラの複数のインスタンスを一度にページに表示する方法を確認し、アクションとターゲットがHTMLとJavaScriptを疎結合に保つ方法が分かりましたね。
次は、コントローラの設計を少し変更するだけで、より堅牢な実装ができることを見てみましょう。
原文
# Wrap-Up and Next Steps
In this chapter we looked at a real-life example of wrapping a browser API in a Stimulus controller. We saw how multiple instances of the controller can appear on the page at once, and we explored how actions and targets keep your HTML and JavaScript loosely coupled.
Now let’s see how small changes to the controller’s design can lead us to a more robust implementation.